How to Check Software Installed in Windows 10
While installing a program or app, most of us usually ignore the installation path and complete the installation. Later, when it is needed, we just don't remember the installation path or location of that program. Thankfully, there are multiple ways that can help us find where a program is installed in Windows 11/10. This post covers all such ways.
Find where a Program is installed in Windows 11/10
We have already see how to find the installation location of Microsoft Store apps, now let us see how to find where a software or program is installed in Windows 10, using any of the following methods:
- Using Desktop shortcut of the program
- Using the Start menu
- File Explorer
- The Search box of Windows
- Using Task Manager
- Settings app
- Using a free third-party tool.
By default, Windows 11/10 will install programs in the Program files folder or the Program files (x86) folder. These methods will give you the exact location.
1] Using Desktop shortcut of the program

This is a very basic and easier way to find a program's location. If you have a desktop shortcut to that program, then this option is handy. The steps are as follows:
- Right-click on the shortcut of the program
- Select Properties option
- In the Properties window, access the Shortcut tab
- In the Target field, you will see the program location or path.
Alternatively, you can simply right-click on the program shortcut and select the Open file location option. This will open the folder where that program is installed.
2] Using the Start menu

This option is useful only when a shortcut of the program is available in the Programs folder under the Start menu folder. Here are the steps:
- Open Start menu
- Now right-click on the program, access More, and select Open file location
- The Program folder will open and program shortcut will be selected
- Right-click on that shortcut
- Select the Open file location option.
The following location will open:
C:\Users\<username>\AppData\Roaming\Microsoft\Windows\Start Menu\Programs
Now again right-click on the app's icon and select Open file location and this time the installation folder of that program will open.
3] File Explorer
Mostly, all the installed programs are stored under Program Files (if it is a 64-bit program) or Program Files (x86) folder (if it's a 32-bit program). So, you can take the help of File Explorer to access those folders and find where your program is installed. The steps are:
- Open File Explorer using Win+E hotkey
- Access the drive where Windows is installed (usually, it is C Drive)
- Access Program Files/Program Files (x86) folder
- There will be a folder with the program name.
4] Search box of Windows 11/10

Whether you have some shortcut or there is no shortcut for a program at all, this option is quite helpful to access the folder where a program is installed. Follow these steps:
- Click on the search box
- Type the exact name of the program
- In the search results, you will see that program
- On the right-hand side, click on the Open file location.
Alternatively, you can also right-click on the program name in the search result and access the Open file location option. Program folder will open in which you will see all the files of that program.
5] Using Task Manager

This is another great way to access the installation path of a program and this option also doesn't need any shortcut of the program. The steps are as follows:
- Run the program whose location you want to access
- Open Task Manager
- It Task Manager is opened in compact view mode, then use More details option available on the bottom left part to expand it
- Switch to the Details tab
- Right-click on your program name
- Click on Open file location option.
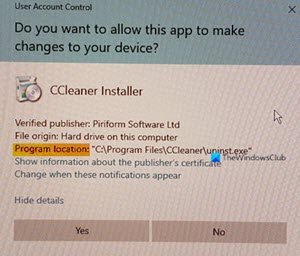
6] Settings app

Here are the steps:
- Press Win+I hotkey to open the Settings app
- Click on the Apps category
- On the right-hand side, scroll down, and you will see the list of installed programs and apps
- Click on a program
- Use Modify (if available) or Uninstall button
- A User Account Control box will open
- Click on the Show more details option and you will see the program location
- Press the No button in the UAC box to exit it.
Read: How to find the Installation date for apps and programs.
7] Using a free third-party tool
You can also take the help of some free third-party tool that can easily show you the location of a program on its interface. For example, you can use some Task Manager alternative tools that show various details for a program like a file name, program location, processes, etc.
There are some free program uninstaller software also available that can help you find where a program is installed in Windows 11/10. If you want, you can try any of those tools.
Hope all these options will be helpful to you.

Anand Khanse is the Admin of TheWindowsClub.com, a 10-year Microsoft MVP (2006-16) & a Windows Insider MVP. Please read the entire post & the comments first, create a System Restore Point before making any changes to your system & be careful about any 3rd-party offers while installing freeware.

How to Check Software Installed in Windows 10
Source: https://www.thewindowsclub.com/how-to-find-where-a-program-is-installed-in-windows-10
0 Response to "How to Check Software Installed in Windows 10"
Post a Comment